Orthographic/lightbox views
FSLeyes 1.19.0.dev10+gc3a33e578 has two primary 2D views - the orthographic (ortho) view, and the lightbox view.
Ortho view
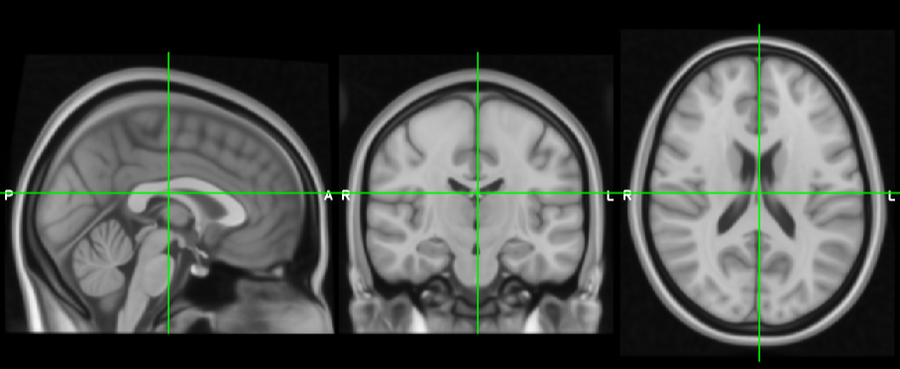
The ortho view comprises three canvases, which display your overlays along three orthogonal planes. For a NIFTI image which is oriented acording to the MNI152 template, these canvases correspond to the sagittal, coronal, and axial planes.
Ortho view interaction
You can interact with an ortho view in a number of ways:
Click, or click and drag, to change the current location.
Right click and drag to draw a zoom rectangle. When you release the mouse, the view will zoom in to that rectangle.
Hold down the ⌘ key (OSX) or ⌃ key (Linux), and use your mouse wheel to zoom in and out of a canvas.
Hold down the ⇧ key, and use your mouse wheel to change the current location along the depth axis for that canvas (i.e. to scroll through slices).
If a mesh overlay is selected, hold down the ⇧ and click the mouse to select the mesh vertex that is nearest to the mouse click.
Middle-click and drag, or hold down the ⌥ key and drag with the left mouse button, to pan around.
Hold down the ⇧ key and the ⌘/⌃ key, then click and drag the mouse to adjust the brightness and contrast of the currently selected overlay. Moving the mouse vertically will adjust the contrast, and horizontally will adjust the brightness.
Hold down the ⇧ key and the ⌘/⌃ key, then right-click and drag the mouse to select a region in the currently selected image. When you release the mouse, the image display range will be set to the minimum/maxmimum voxel intensities within the selected region.
You can reset the view to its default zoom/pan settings by pressing the
button on the ortho toolbar, or selecting the Settings ⇒ Ortho view 1 ⇒ Reset display menu item.
Ortho toolbar
The ortho toolbar contains some controls allowing you to configure an ortho view. More settings are available in the view settings panel.
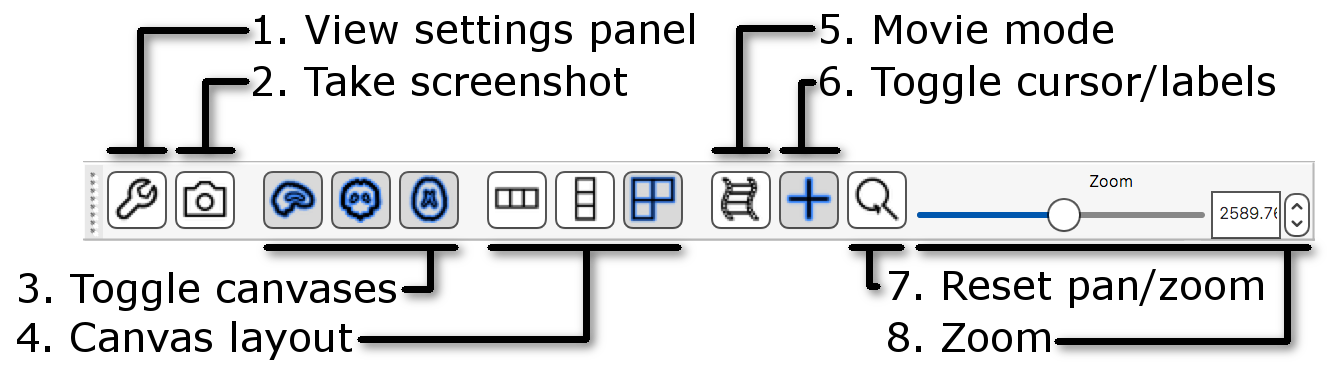
View settings panel Clicking the
 button will open the
view settings panel,
which contains more options for configuring the ortho view.
button will open the
view settings panel,
which contains more options for configuring the ortho view.Take screenshot: Clicking the
 button allows you to save
the current ortho scene as a screenshot.
button allows you to save
the current ortho scene as a screenshot.Toggle canvases These buttons allow you to individually toggle each of the canvases on and off.
Canvas layout These buttons allow you to switch the canvas layout between horizontal, vertical, and a grid layout.
Movie mode Clicking this button will enable movie mode.
Toggle cursor/labels This button allows you to turn the location cursor and anatomical labels on and off.
Reset pan/zoom This button will reset the pan and zoom settings on the three canvases.
Zoom This control allows you to set the zoom level on all three canvases at once.
Ortho view settings
All of the settings which are available on the ortho toolbar, along with some more options, are
available in the view settings panel (accessed via the ![]() button)
[*]:
button)
[*]:
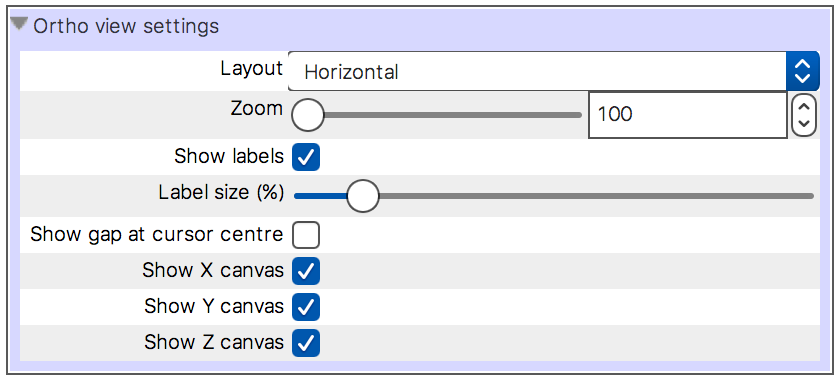
Here you can turn on/off anatomical labels and adjust their size, and toggle a gap at the location cursor centre.
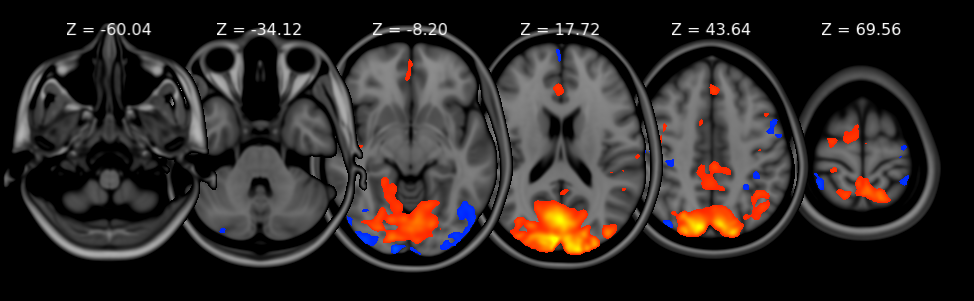
Lightbox view
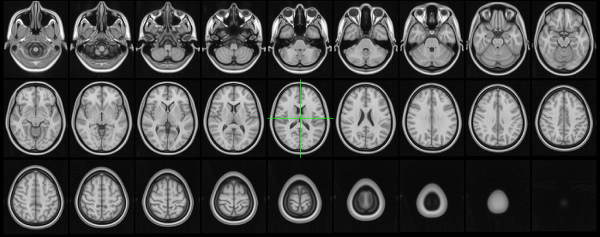
The lightbox view displays a series of adjacent slices along a single plane through your overlays. You can adjust the start/end points, and adjust the slice spacing.
Lightbox view interaction
Click, or click and drag, to change the current location.
Use your mouse wheel to scroll up and down through the slices.
Hold down the ⌘ key (OSX) or ⌃ key (Linux), and use your mouse wheel to zoom in and out of the canvas. Zooming on a lightbox view simply changes the number of slices which are displayed.
Lightbox toolbar
Similar to the ortho toolbar, the lightbox toolbar allows you to control how the lightbox view displays your overlay.
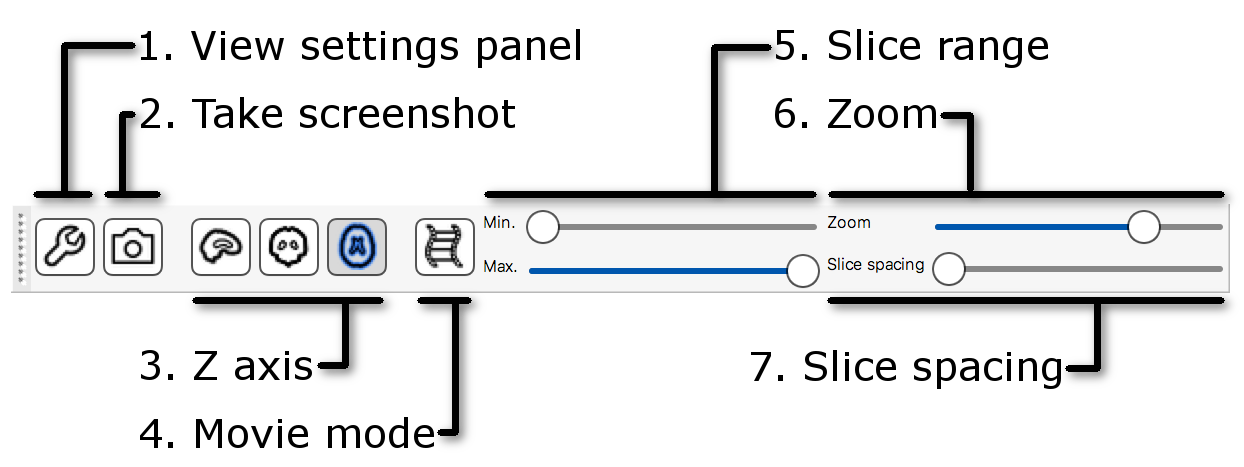
View settings panel Clicking the
button will open the
view settings panel, allowing you
to further configure the lightbox view.Take screenshot Clicking the
button allows you to save
the current lightbox scene as a screenshot.Z axis These three buttons allow you to switch between displaying slices along the three orthogonal planes.
Movie mode This button enables movie mode.
Slice range These sliders allow you to adjust the position, along the Z axis, of the first and last slices which are displayed on the lightbox view.
Zoom This slider allows you to zoom in and out of the lightbox view (shrinking/enlarging the current slice
Slice spacing This slider allows you to adjust the distance, along the Z axis, between adjacent slices.
Lightbox view settings
The view settings panel for a lightbox view contains the same settings that are available on the lightbox toolbar, along with some additional settings.
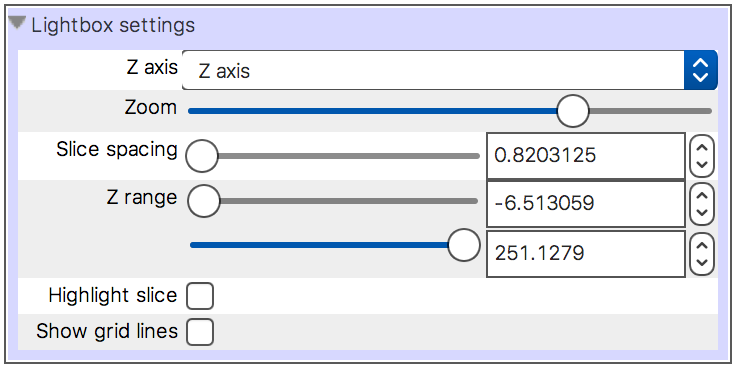
The additional settings that are available are:
Slice overlap Overlap adjacent slices horizontally and vertically.
Reverse slice order Reverse the order in which slices are displayed, so that the last slice is displayed at top-left.
Reverse slice overlap Reverse the order in which slices overlap each other - by default, later slices are drawn on top of earlier slices.
Highlight slice Draw a rectangle around the current slice.
Show grid lines Draw a grid of lines between rows and columns.
Show slice location Show the slice location, in voxel or world coordinates, at the top of each slice.
Sample slices at Control whether the displayed images are sampled in the centre, or at the beginning, of each lightbox slice. You can read more about this setting here.
Choose slices This button opens the lightbox slices panel which allows you to configure the displayed slices according to the voxel coordinates of an image, rather than as proportions.
The overlay list
The overlay list displays a list of all overlays that you have loaded.
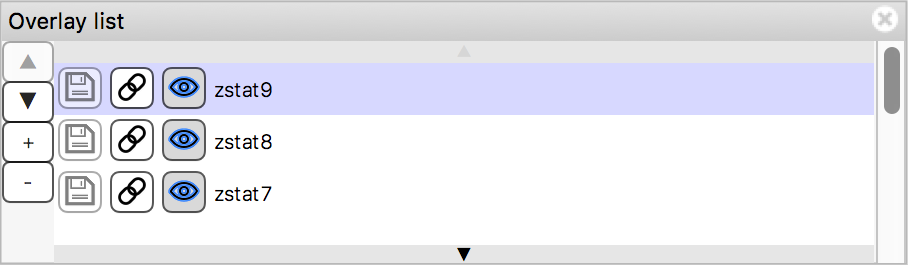
The overlay list allows you to do the following:
Change the currently selected overlay, by clicking on the overlay name.
Identify the currently selected overlay (highlighted in blue).
Add/remove overlays with the + and - buttons.
Change the overlay display order with the ▲ and ▼ buttons.
Show/hide each overlay with the
button, or by double clicking on the overlay name.
Link overlay display properties with the
button.
Save an overlay if it has been edited, with the
button.
Left-click and hold the mouse button down on the overlay name to view the overlay source (e.g. its location in the file system).
The location panel
The location panel shows the currently displayed location, relative to the currently selected overlay.
For NIFTI images, the location is displayed in both voxel coordinates and world coordinates [†], along with a label which defines the world coordinates for the currently selected overlay - in the example above, the world coordinates for the selected overlay are defined by the MNI152 standard space.
You can use the coordinate controls to change the currently displayed location and, for 4D NIFTI images, use the volume control to change the currently displayed volume. Clicking on the Copy coordinates button will copy the current world and voxel coordinates to the system clipboard.
Warning
Note that FSLeyes starts counting volumes from 0, not 1.
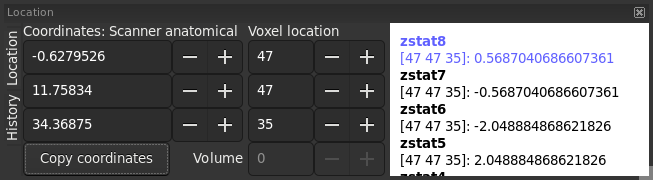
The area on the right of the location panel displays the intensity values at the current location for every visible overlay. For NIFTI images, the corresponding voxel location (and volume index, for 4D images) is also shown.
Location history
Clicking the History tab on the left of the location panel will bring up a list of all of the locations that you have visited, recorded in world coordinates.
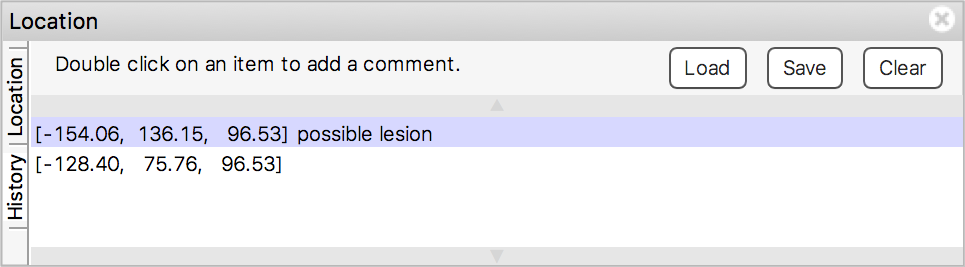
Clicking on a location will take you back to that location. You can also double-click on an entry to add a comment about that location. You can save the location history out to a text file, and load in a previously saved history using the buttons along the top.
Annotations
The ortho view allows you to add annotations to any of its three canvases - you can add text and simple shapes to a scene. Opening the Annotations panel (Settings ⇒ Ortho view ⇒ Annotations) will add the annotations panel to the ortho view:
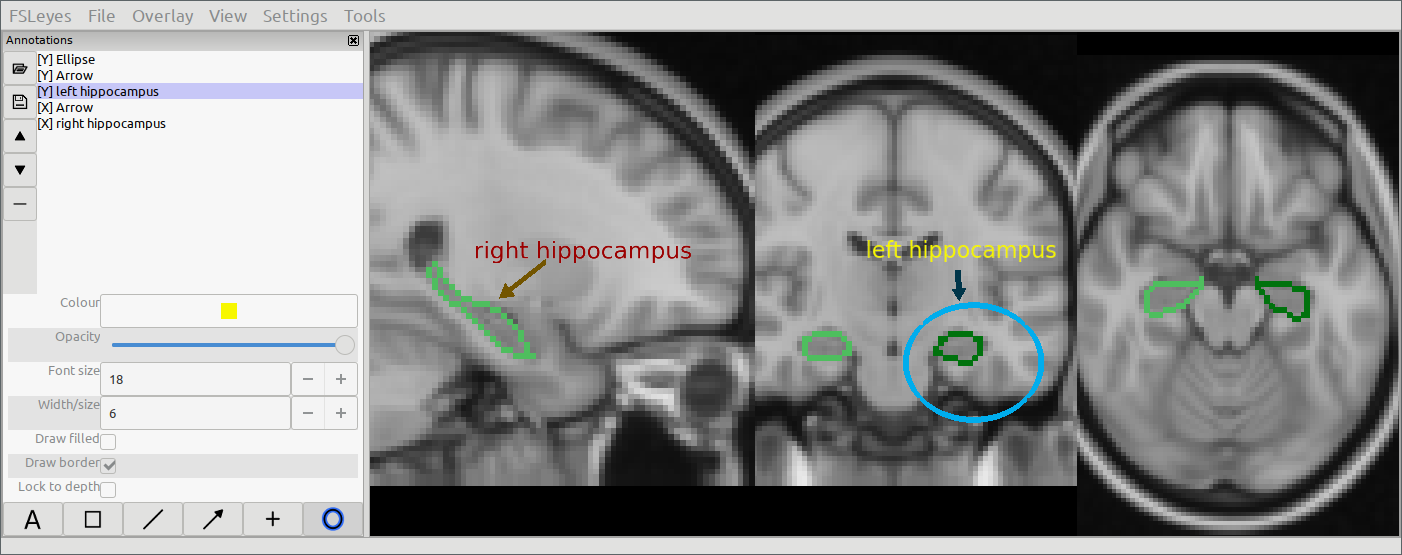
The buttons along the bottom allow you to choose the annotation type - currently you can choose from text, rectangles, lines, arrows, crosshairs and ellipses. After selecting the annotation type, you can click (for text and crosshairs), or click and drag (for rectangles, lines, arrows and ellipses) on an ortho canvas to add the annotation. After you have added an annotation you can right-click and drag on it to move it around, and you can use the controls on the annotation panel to adjust display settings such as colour, opacity, and line width.
Each annotation that you add will appear in the annotations list. You can select an annotation in this list, and use the controls to adjust its display properties. You can also change the order in which the annotations are drawn by selecting an annotation and using the ▲ and ▼ buttons. The - button will remove the currently selected annotation.
If you need to save the annotations you have drawn, you can do so using the
![]() button. This will save your annotations to a plain text file.
You can load an annotation file back in via the
button. This will save your annotations to a plain text file.
You can load an annotation file back in via the ![]() button.
button.
Ortho/lightbox view settings
Ortho and lightbox views (and the 3D view) have a view settings panel, which contain various settings. Many of the settings in this panel are common to both ortho and lightbox views, and are described here.

A number of basic and advanced options can be configured through the view settings panel:
Show location cursor The location cursor can be toggled on/off.
The canvas Background colour can be changed.
The canvas Foreground colour can be changed. This controls the font colour. Note that the foreground colour will be automatically adjusted whenever you change the background colour.
The Location cursor colour can be changed.
If you are using a mac with a retina display, you can turn on the Enable high-DPI rendering option to take full advantage of your display’s resolution.
You can change the Display space reference overlay - the display space is further described here.
Display in radiological orientation The view orientation can be toggled between radiological and neurological [‡].
The remaining options in the view settings panel are described below.
Linking views
When you have more than one view open in FSLeyes (e.g. multiple ortho views), you can choose to have various properties between them linked or unlinked.
Link overlay order When this setting is selected, the overlay order (as controlled through the overlay list panel) will be the same across linked views. This setting is selected by default.
Link location When this setting is selected, the display location will be the same across linked views. This setting is selected by default.
Link overlay display settings When this setting is selected, all overlay display settings (e.g. display range, colour map) will be the same across linked views [§]. This setting is unselected by default.
Link overlay volume settings When this setting is selected, the volume for 4D overlays will be linked across views.
Movie mode
If the currently selected overlay is a 4D NIFTI image or a mesh with 4D vertex data loaded, turning on movie mode will causes FSLeyes to automatically loop through all of the 3D volumes in the image (or time points in the mesh vertex data). This allows you to quickly scan through 4D images to, for example, visually check for motion artefacts in fMRI time series, or check registration alignment in a collection of T1 MRI images. The Movie update rate setting will adjust the speed at which the movie frames change. You can also change the image axis (X, Y, Z, or time/volume), to loop through via the Movie axis setting.
Note
If movie mode is not working for you, try changing the Synchronise movie updates setting.
Colour bar
You can add a colour bar to ortho and lightbox views, which will display the mapping between voxel intensity values and the colour map for the currently selected overlay [¶]. You can choose to display the colour bar on the top, bottom, left, or right of the canvas, and on which side the colour bar labels are shown.
